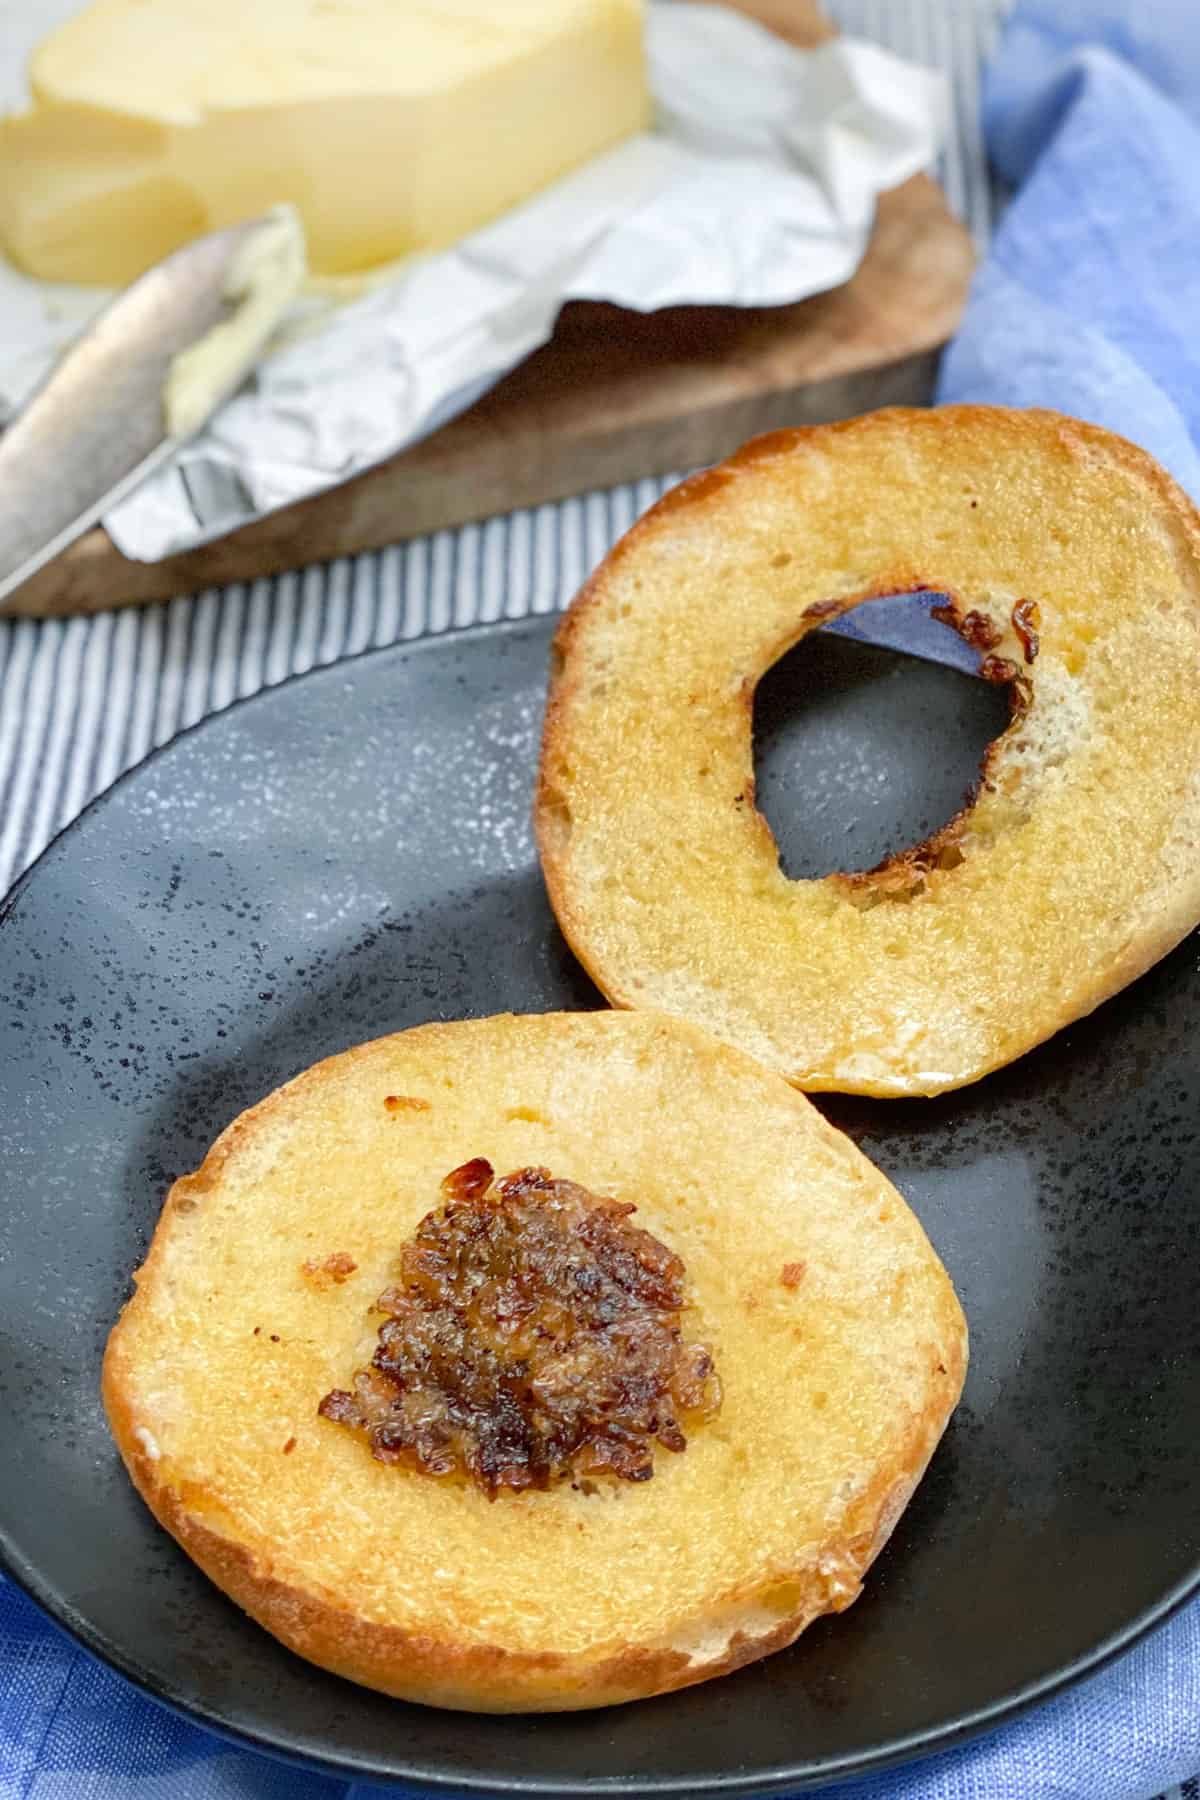
A Bialy is a delicious, oniony breakfast roll in the family of bagels, only better! Its unique shape results in asymmetrical pieces upon slicing, with one side having a hole and the other having an onion filling in the center. They are best served toasted, then sliced and spread with butter - I won’t eat them any other way. Bialys came to New York in the early 1900s with the immigration of Eastern European Jews. I can only imagine the taste of these special treats made their new world feel a little more like home.
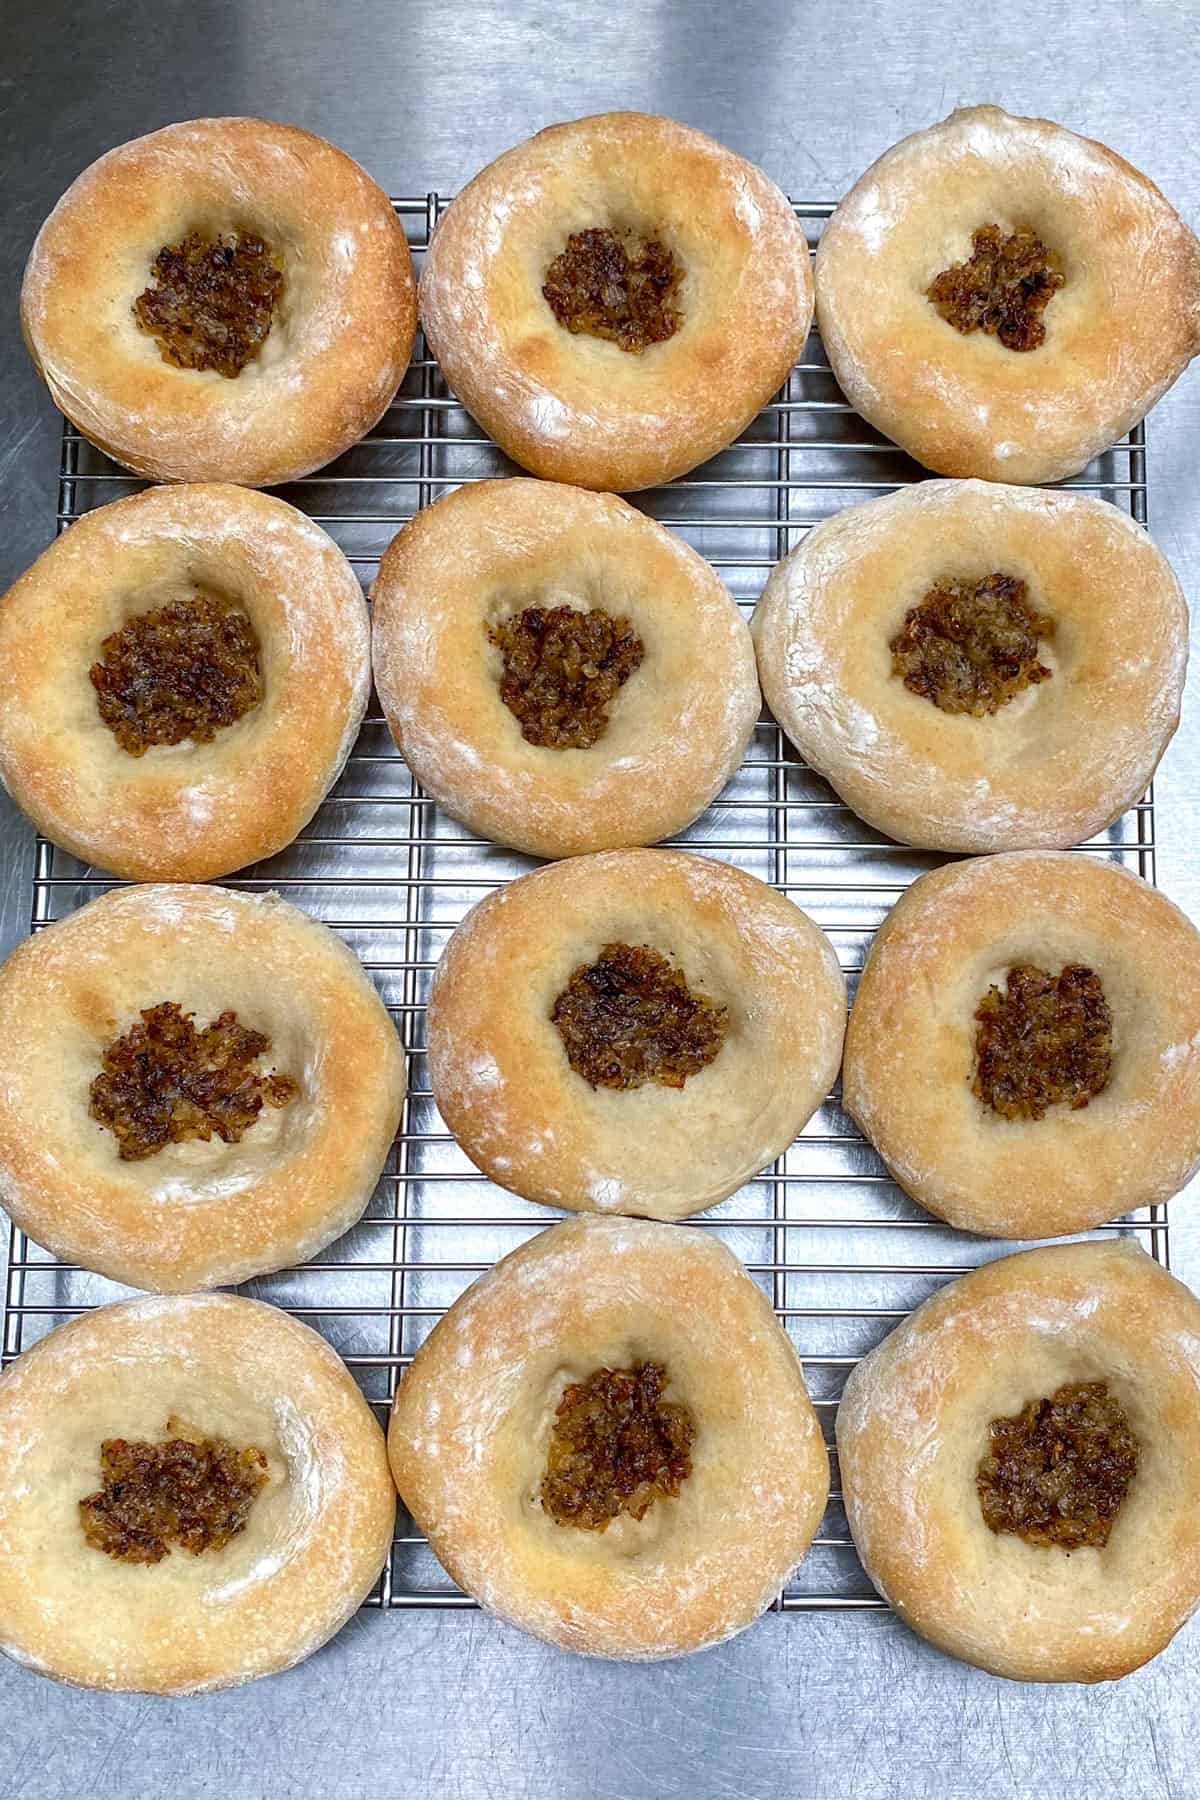
Hi everyone. It’s Eddie, Lisa’s husband, with a guest appearance to present one of my favorite all-time foods: bialys. Bialys have a very special place in my heart - I have been eating them all my life. When my three brothers and I were little boys and my maternal grandparents would come to visit, they would always bring bialys from Brooklyn. I can still remember our excitement when they would pull dozens of bialys out of their “valises” when they arrived.
We would often toast them up right then and there, whatever time of day. My grandpa, who we called Poppy, had immigrated from the city of Siematycze, not far from Bialystock, the birthplace of the bialy. He was a self-styled expert on bialys. I will share Poppy’s instructions for how to spread butter on bialys later in this post. He was pretty pedantic about this, but I have to admit he was right.
I have been baking bread for 30 years, but it never occurred to me to attempt to make a bialy. Then came the pandemic. Like everyone else and their brother, I got going with sourdough bread baking once it was clear we were going to be in our homes for the long haul. Eventually I decided to give bagels a try. After about two or three batches I got the hang of it. Then my Aunt Phyllis, who became the bearer of bialys after Poppy passed away, suggested I try making bialys. And here we are!
How to Make Bialys
Bialys have “the big four” ingredients that all bread recipes have: flour, yeast, water and salt. There is also a little sweetness added - I use a combination of honey and brown sugar. Finally, the game-changing ingredient is caramelized onions. I find the various steps along the way, kneading, rising, cutting and shaping to be zen inducing.
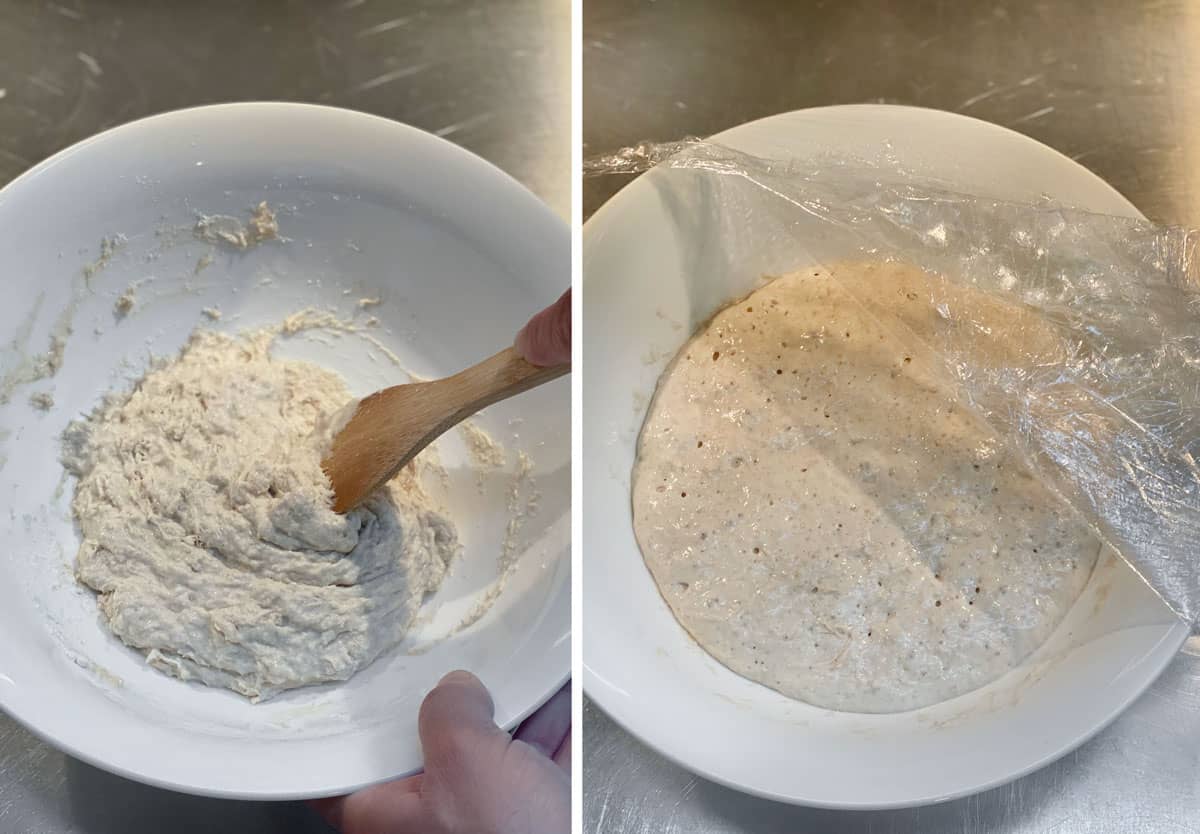
- Mix the “Pre-ferment” - this is a combination of water, flour, instant yeast, sugar and honey. No salt is added at this time as it retards the activity of the yeast.
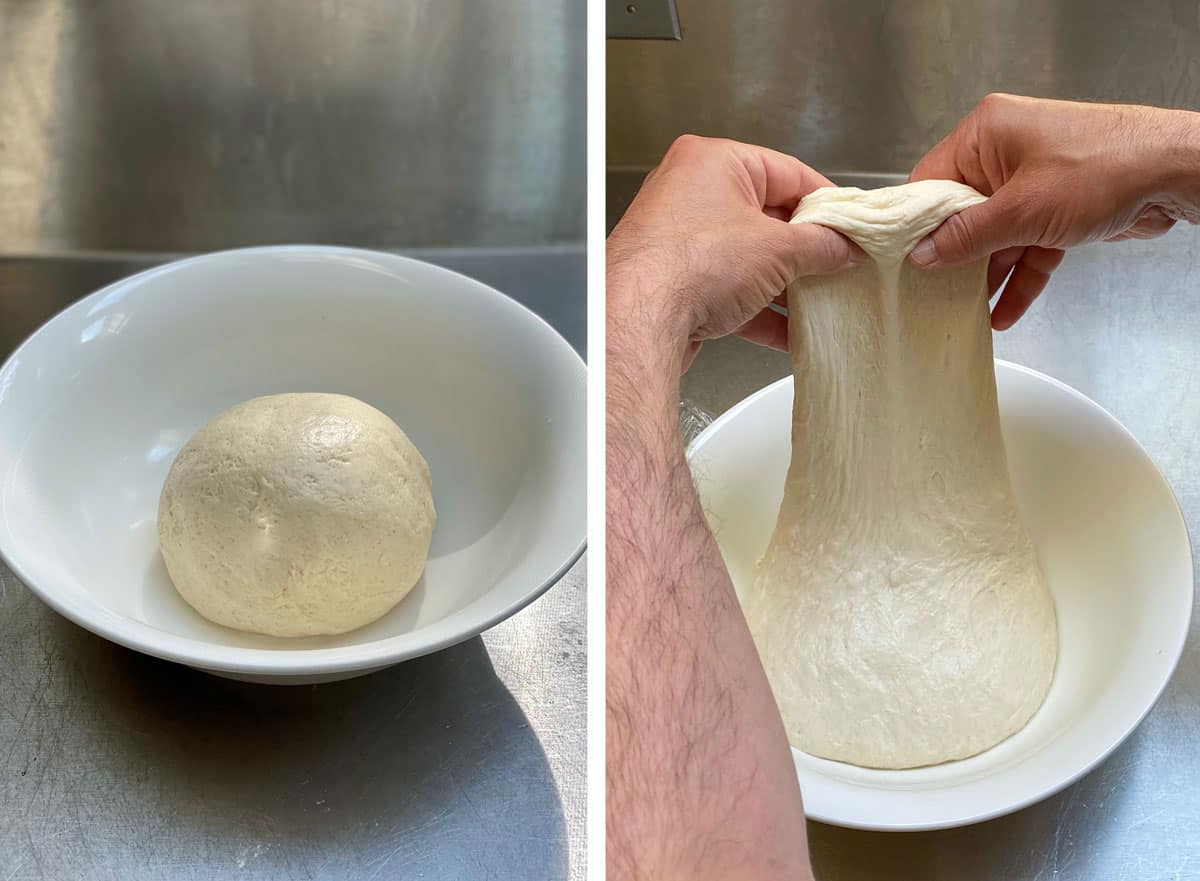
- Form the dough by adding remaining flour, water and salt after the pre-ferment has risen, and knead for 10 minutes or so. Let rise, covered, for another hour or so, then fold upon itself using the “stretch and fold” method and let rise again for another half hour.
- Meanwhile, caramelize the onions by sautéing with a pinch of salt and, if desired, a few teaspoons of poppy seeds. I tend to do this so I can honor my Poppy and think about him when I make this recipe.
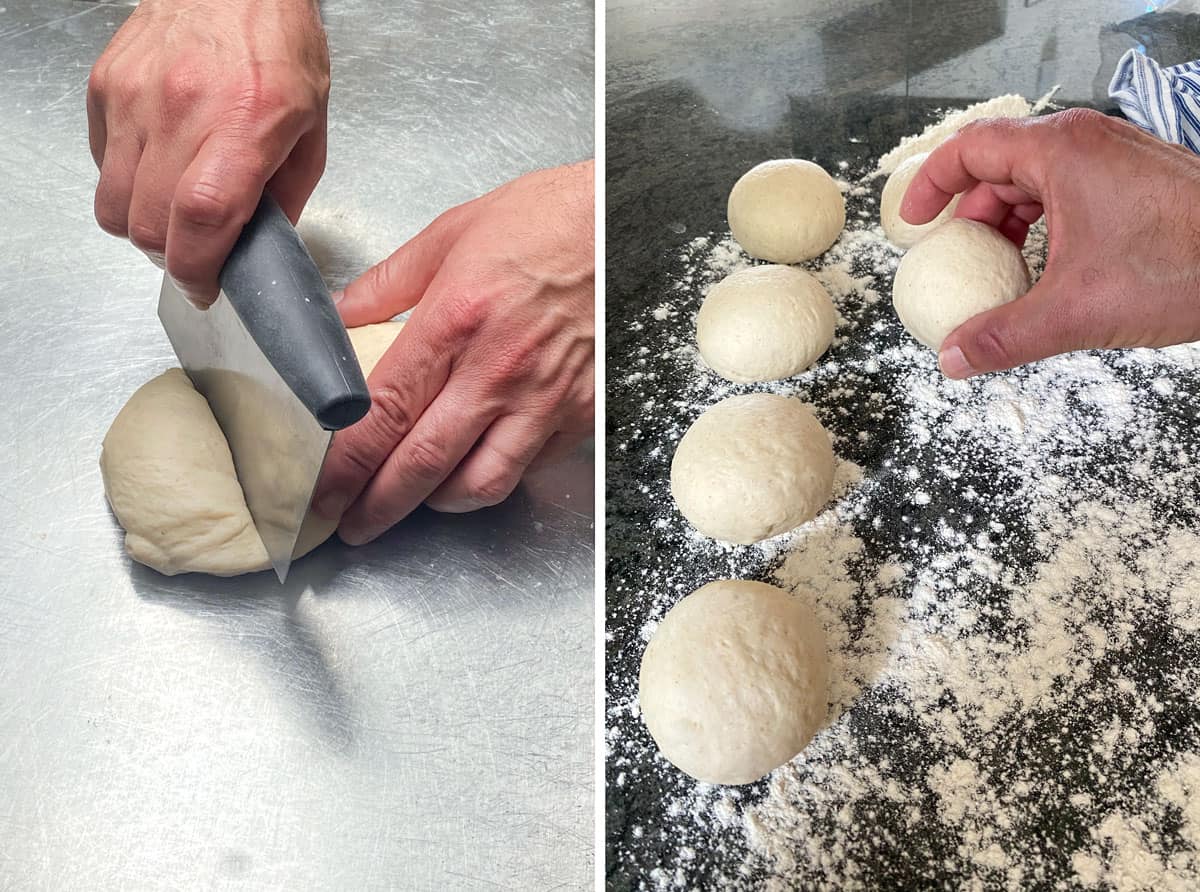
- Divide the risen dough into twelve pieces (measure using a scale to make equal), and form into balls. Let these rise for 45 minutes.
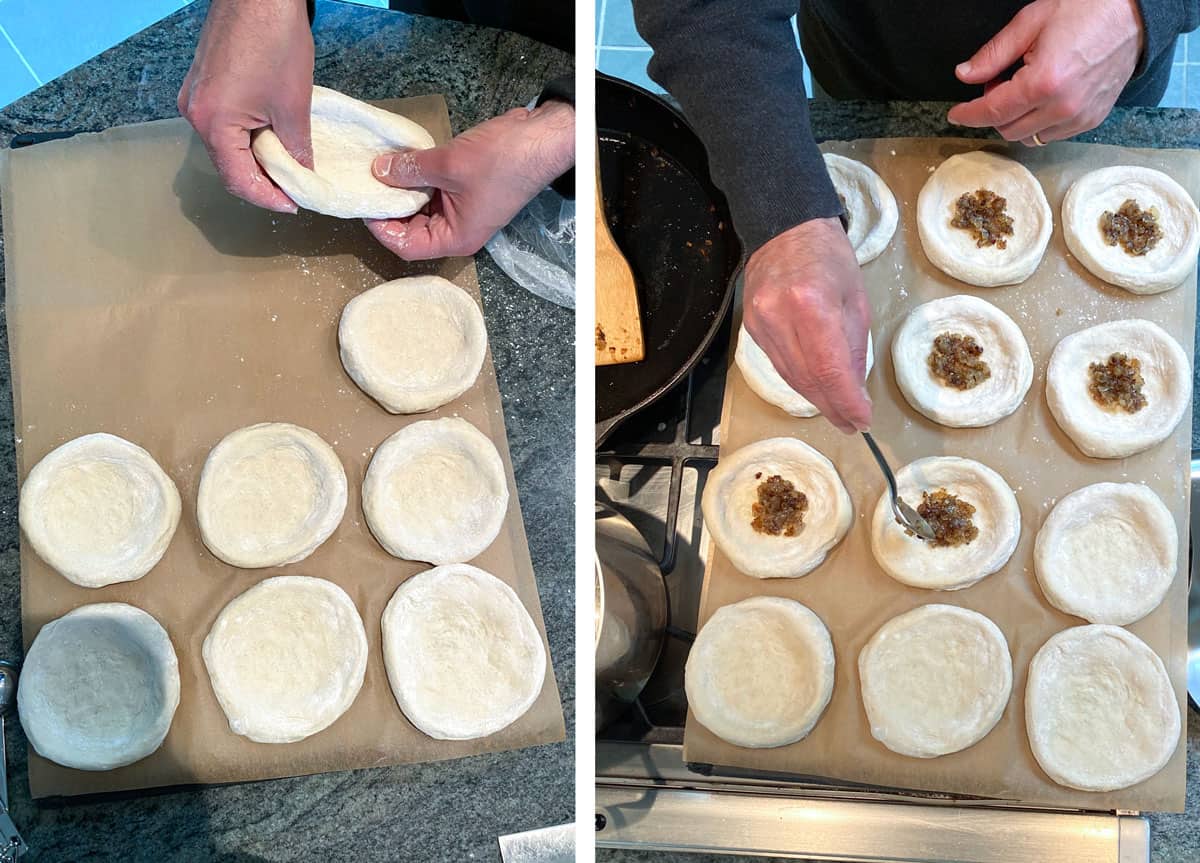
- Form into discs with a thin membrane in the center and fill with caramelized onions. Let rise for another 45 minutes.
- Bake in a 500 degree oven for 10 minutes until lightly browned. Remove and let the bialys sit on a rack to cool. If you want to devour one about 5-10 minutes out of the oven, this is allowed.
- Slice and freeze if not eating immediately. I find that even by letting these sit overnight for the next day they will lose some of their freshness, but you can keep them in the freezer for weeks or longer. It is very simple to pop the frozen bialy in a toaster and it will taste like it is fresh out of the oven.
This recipe has come together over time, and represents a “composite character” of several videos and recipes I reviewed along the way, along with some changes I have made via trial and error. My top sources were: Just One Bite Please, The Spruce Eats, and Chef Mark Strausman.
Bonus: Poppy’s instructions for how to butter a bialy
Poppy would often stand around watching with pride as we would toast and eat the bialys he had brought. One time when I was spreading butter, he said “what are you doing? This is not how to butter a bialy.” The butter was still cold from the fridge and I was knifing off one piece at a time and doing my best to spread it while it was still hard. “First you put little pieces of the butter on one side of the hot bialy, then the other”, he told me. “Then when you go back to the first side, the butter is melted and you can spread it easily. Then go back to the other side and do the same thing.” To this day I follow his advice from the Old Country and always think about him when I butter my bialy. Thanks Poppy, for showing me the way - you would be happy to know I have now passed this wisdom on to my own kids.
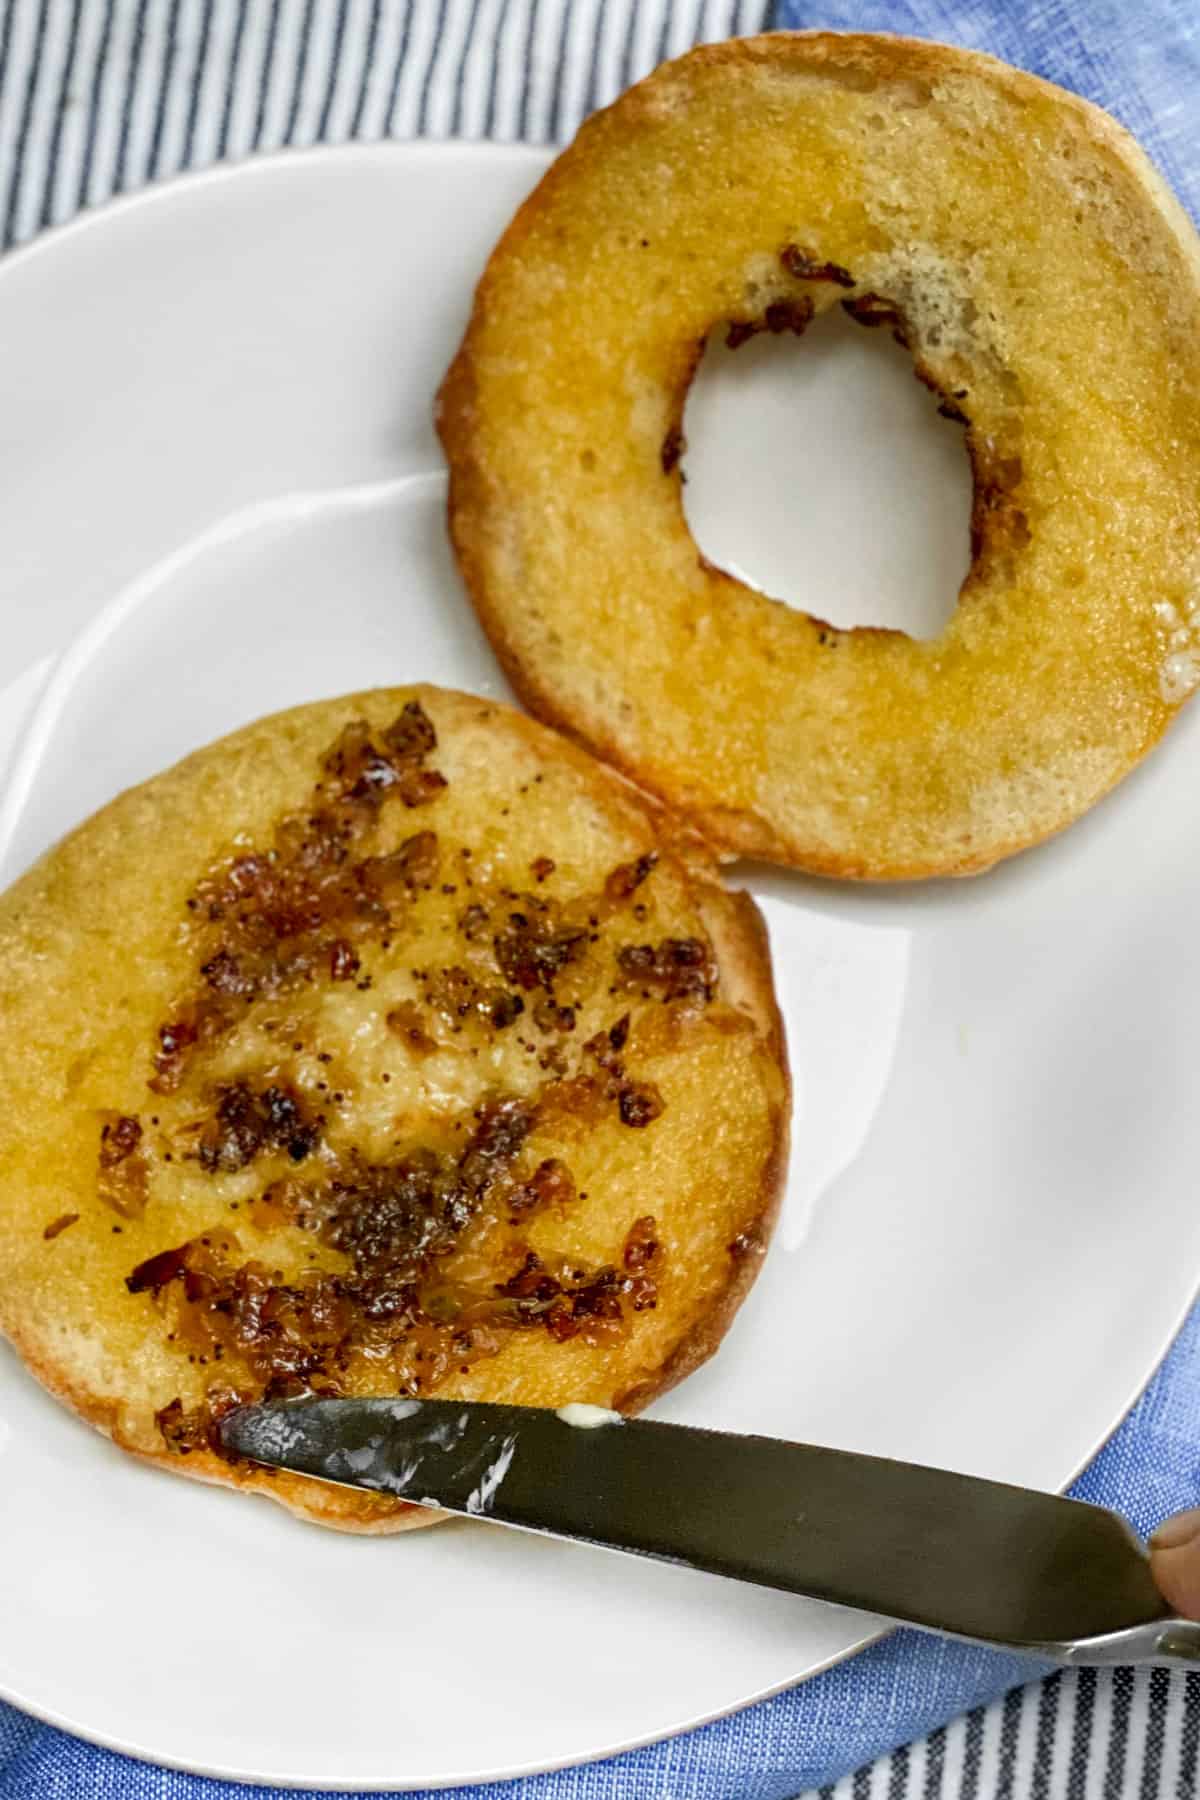
One more thing: it always seemed a shame to me that there was essentially only one bite of the entire bialy that had the onion filling. The amount of onions in in this recipe is much more generous, allowing you to spread them out so you can enjoy their caramelized flavor in more bites of your bialy.
If you want another great baking project, be sure to check out my homemade bagels recipe.
Here's Our Favorite Bialy Recipe. If you try this recipe, I hope you'll come back to leave a star rating and a comment and let Lisa and me know how they turn out.
PrintRecipe

Our Favorite Bialy Recipe
- Total Time: 6 hours, 45 minutes
- Yield: 12 Bialys
Description
These bialys are as satisfying to make as they are to eat and they are a great way to start your day. The total amount of time you spend actually doing something during the process is less than an hour. The rest is letting the dough rise in its various shapes and forms.
Ingredients
- 1 ¾ cup plus 2 tablespoon all-purpose flour (236g)
- 1 cup lukewarm water (236g)
- 1 tsp instant yeast (3g)
- ½ tsp honey
- ½ tsp brown sugar
- Pre-ferment from above
- ¾ cup lukewarm water (175g)
- 3 ¼ cups all-purpose flour (400g), plus more as kneaded (see what I did?)
- 2 ¼ tsp sea salt (14g)
- 1 ½ large onions (or 2 medium sized), diced to produce 2 ½ cups
- ¼ cup vegetable oil
- ¼ tsp salt
- 2 tsp poppy seeds (optional)
Instructions
- In a large bowl (3 quarts), combine pre-ferment ingredients: flour (1 ¾ cups), water (1 cup), instant yeast (1 tsp), honey (½ tsp) and brown sugar (½ tsp). Mix until all ingredients are smoothly incorporated. Cover with plastic wrap and let stand at room temperature for 1 ½ hours.
- While the pre-ferment is in process, heat vegetable oil (¼ cup) in a large skillet over high heat. When hot, add diced onions (2 ½ cups), salt (¼ tsp) and poppy seeds (optional) (2 tsp). Turn down to low heat and sauté until the onions are golden brown, about 10-15 minutes, stirring occasionally. Remove from skillet and let cool in a bowl.
- After the pre-ferment has sat for an hour and a half, add the remaining dough ingredients: flour (3 ¼ cups), water (¾ cup) and sea salt (2 ¼ tsp). Mix with a large wooden spoon in the bowl until the dough hangs together, then turn out onto a flourless surface, with extra flour nearby. Knead for about 10 minutes. If the dough begins to stick to your hands, bring in some of the additional flour a little at a time until the dough is “tacky” but no longer sticky. Clean out bowl and lightly grease with vegetable oil. Form a ball with your kneaded dough, roll around in the bowl and then cover with plastic wrap and let sit at room temperature for an hour.
- After the dough has risen for an hour, take off wrap and then, with the dough still in the bowl, do a series of four “stretch and folds”. This involves grabbing one side of the dough and lifting it up, stretching it and then folding it back over the remaining dough. Rotate the bowl a quarter turn and do the same again. Follow this approach two more times until each “corner” of the dough has been lifted, stretched and folded back over the dough. Then turn the dough over in the bowl, re-cover and let sit for another 30 minutes.
- Take risen dough out and divide into 12 pieces of approximately equal size. I weigh these as I go - should be about 89g per piece. Cover these with a dish towel and then one by one on a clean surface (no flour for this step!) form into a ball. I do this by folding each piece upon itself and rotating, almost like mini stretch-and-folds and then once a tension has formed use the cup of my hand to roll around on the surface into a ball. Pinch the bottom if needed. Set these aside as they are formed on a floured surface, leaving at least 2” between them so they don’t morph together. Then sprinkle them all with flour and cover with plastic wrap and let rise for 45 minutes.
- Line a large rimless baking sheet or transfer board with parchment paper. Lightly flour a work surface. Then take one risen dough ball, roll it around gently to coat with flour, and form it into about a 4” disk by stretching the middle into a thin membrane, leaving the rim thicker. I do this almost as if these are mini pizzas, rotating and stretching as I go. It’s important that the middle is stretched thin rather than being pushed down, which will result in an unwanted rise of that section of the bialy upon baking. Place disc on parchment-lined sheet. Repeat with remain dough balls.
- Spoon 2-3 teaspoons of caramelized onions into the center of each disk. Note - this is more than you will see on a typical store-bought bialy. We will get to that later. Let rise for 30 minutes. Pre-heat oven to 500 degrees with large bread stone or two baking sheets inside.
- To get the bialys into the preheated oven, tilt the transfer board or rimless baking sheet so the parchment, with the bialys on top, slides onto the preheated bread stone or baking sheets (cut the parchment paper in two with bialys on it if you are using two baking sheets). Bake for 10 minutes. They should be golden brown. Remove and transfer to a cooling rack. Allow 15-20 minutes before eating. Some people swear by having these whole, fresh out of the oven just as they are. (I am in the camp of spreading butter on them).
- To save for future breakfasts, slice bialys in half, ensuring one side has a hole in it and the other has all the onions. I do this by cutting them with a bread knife until I get to the center and then rotating and cutting again as I go around vs slicing all the way through, which can be more difficult to keep the onions intact. Once sliced, keep each pair together and freeze. They won’t stay fresh long otherwise.
- My strong recommendation on how to eat a bialy is to toast it, spread it with butter (see the blog post for my grandfather Poppy’s approach to butter spreading), and then spread the onion filling around before eating. Most bialys don’t have enough onions to do this, but these bialys do!! Enjoy.
- Prep Time: 45 minutes
- Rise Time: 6 hours
- Cook Time: 10 minutes
- Category: Bread
- Method: Baking
- Cuisine: Polish




linda A peraino
made your bialys, and they were not only easy but delicious, however, mine looked like yours before baking but somehow while they were baking they rose so high that there was no hole in the middle. What did I do wrong. You stated "room temperature" which is what ? did I knead too much? not enough? etc etc.
Kt
Texture came out great! Next time I make it I'll reduce the salt in the dough. Just a caution for folks who aren't used to working with an oven that hot, stand back when you first open the door or the hot air can scold your eyes!
Anthony
Whoa these are cool. First time I've ever seen them. They look delicious!
restaurantthatdeliversnearme.website
Thanks for the cooking tutorial.
jennifer goldyn
I have been lucky enough to enjoy these fresh out of the oven and they are perfect! Can’t wait to make at our home! Thanks, Eddie and Lisa!!
Lisa
I hope you enjoy making them at home Jen! Thank you for your note 🙂