
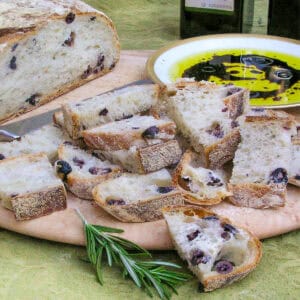
The No-Knead Bread Method is something every cook should know about, a bread-making technique that requires very little hands on effort, no special equipment, and comes out perfect every time. This no knead olive bread, with its irresistible crispy crust, tender crumb and hints of rosemary, is our favorite.
Baking bread is not something I do. I tried once, using the bread machine I got as a wedding gift. On my first attempt I baked the kneading attachment into the loaf. After that I happily turned over the bread-baking to my husband Eddie, who was eager to take it on.
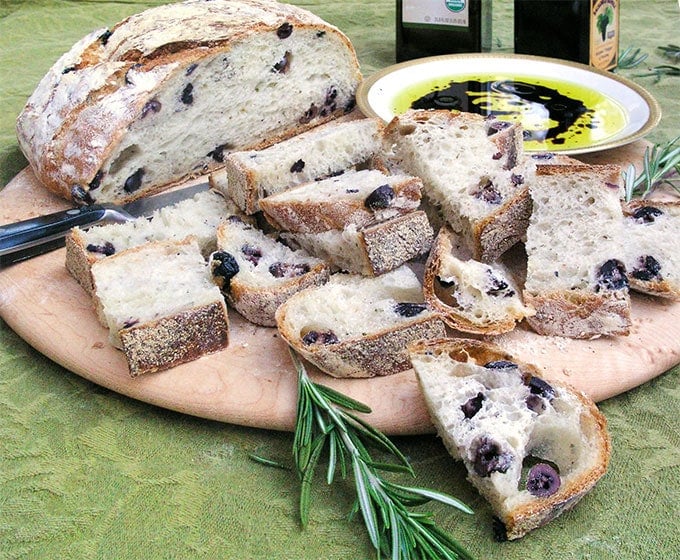
Eddie is the bread baker (and cocktail maker) in our house and on Panning the Globe. He's become famous (among our family and friends) for his incredible olive bread. Whenever he makes it, we all gather round the kitchen island to watch it cool and we sometimes lean in to listen to the crust crackle. But mostly we're there because we can't wait for a slice of that incredible olive bread, warm from the oven, which we cut into small pieces and dip in olive oil and balsamic vinegar.
How To Make Delicious No Knead Olive Bread
This no-knead technique is easier to execute and harder to mess up than traditional bread-baking methods and the final product is something to behold. Start this recipe at least 9 hours before you plan to eat the bread. The actual hands-on labor for making this olive bread is minimal. Most of the time spent on this recipe is waiting for the dough to sit and rise and develop it's wonderful texture.
Here's an overview of the process - see the recipe below for exact details:
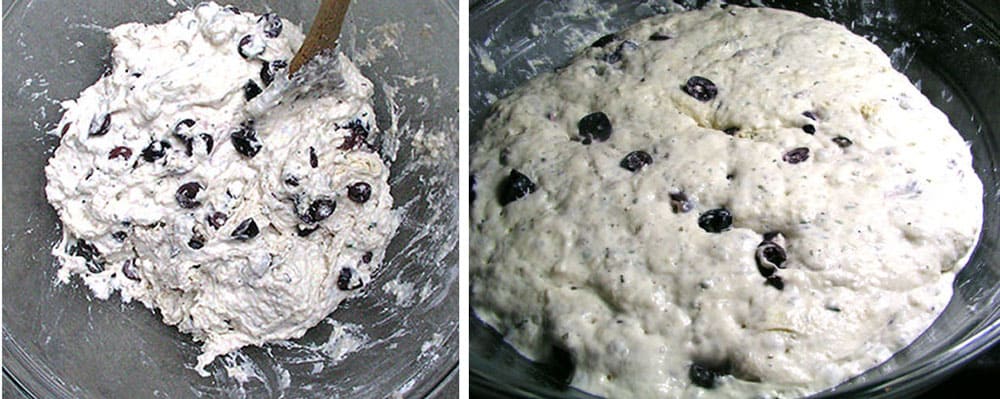
- Mix and First Rise: Mix flour, salt, rosemary and yeast in a large bowl. Pour a mixture of olive oil and water over the dry ingredients and add the sliced olives. Stir the mixture with wooden spoon until all the dry flour is incorporated. Cover the bowl with plastic and let it stand for 4-5 hours, until dough is approximately doubled in size.
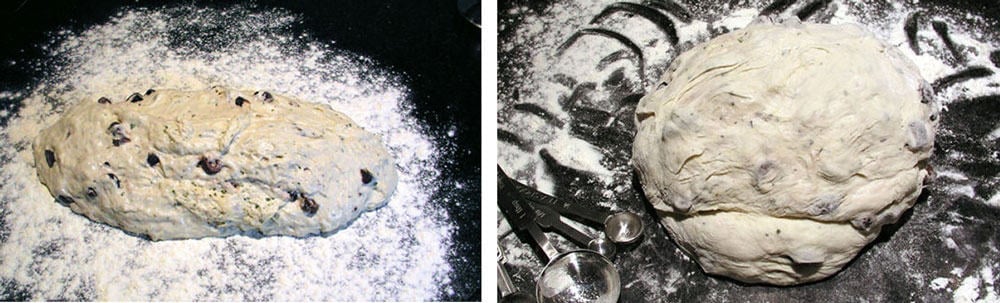
- Rework and Second Rise: Use a rubber spatula to scrape the wet, bubbly dough onto a floured work surface. Let dough sit for about 5 minutes. Dust the surface of the dough with a sprinkling of flour, fold the dough over and press it with the heel of your hand and flip it over and fold it again. Do this several times, until the dough absorbs the fresh flour and loses most of its stickiness. Rinse and dry the bowl and coat it with olive oil. Return dough to bowl and roll it around to coat it with oil from the sides of the bowl. Cover it with plastic and let it sit for 1 ½ -2 hours, until it is about 50% larger.
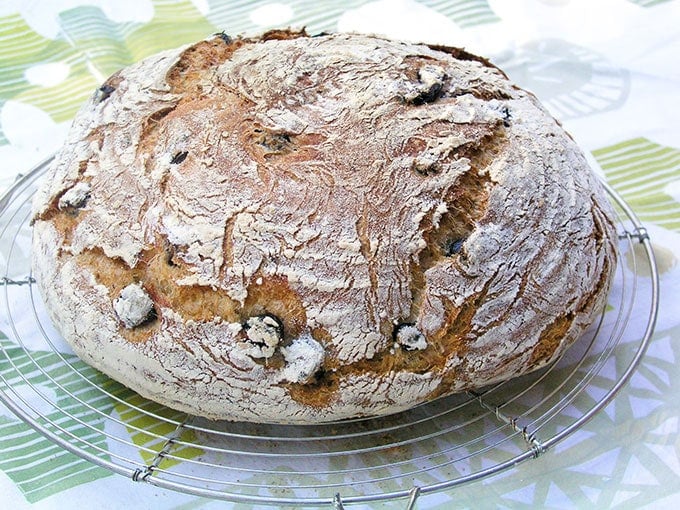
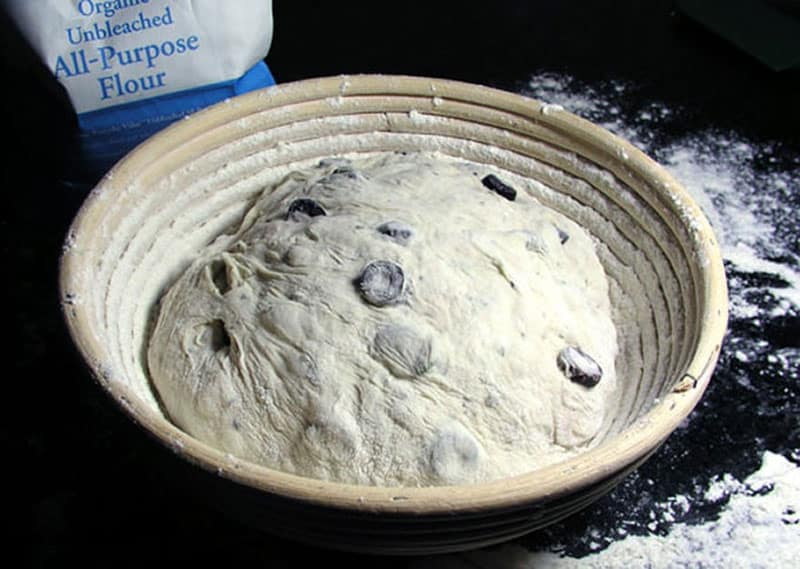
- Rework and Final Rise: Again put dough on a floured surface. Flip and fold about 8-10 times and form a ball. Put ball into a floured Banneton or colander with floured dish towel. Fit the banneton or colander back into the large bowl and cover with plastic wrap. Let sit for about 1 - 1 ½ hours.
- Bake: About a half hour before dough is ready, place the empty Dutch oven, with its lid on, into the middle of the oven and preheat the oven to 500ºF. When the bread is ready (done rising), carefully take the heated Dutch oven out of the oven, set it on the stove or a heat-proof surface, and uncover it. Sprinkle cornmeal over the bottom of the pot. Flip the dough into center of the Dutch Oven, being careful to avoid contact with the sides of the pot, to get the ideal shape. (If the dough touches the side of the pot, you will need to use a spatula to position it into the center of the pot. It will taste just as good.) Cover pot, place into the hot oven and reduce temperature to 450ºF. Bake for 25 minutes. Remove the lid. Bake for an additional 20-30 minutes until the crust is nicely browned. Remove the pot from the oven, transfer the bread to a cooling rack and let it stand for 20 minutes before slicing.
After we sold our bread machine at a garage sale, Eddie started collecting books on the art of bread making. He tried all sorts of types and techniques over the years, hoping to achieve his vision of the perfect bread. Each time a bread would come of the oven, there was much anticipation. At times Eddie would say "I think this might be "The One." Over a period of about 16 years there were numerous excellent breads with some nearing perfection. But the family concurred that none had earned the status of being "The One," so the quest continued until along came something new and exciting in the world of bread baking.
Jim Lahey's No Knead Bread Recipe
In 2006, The New York Times reported on a revolutionary new bread-making method developed by Jim Lahey of New York's Sullivan Street Bakery. This technique, they explained, requires almost no kneading and empowers the home cook to turn out bakery-quality loaves. The time consuming and challenging kneading process required in traditional bread making is virtually eliminated here, and a Dutch oven is used to simulate the environment of a professional bread oven.
Eddie played around with the no-knead recipe for a while, finally adding olives and fresh rosemary from our herb garden. One day out of the oven came "The One!" Eddie's been making this no-knead olive bread for several years now and it is "The One" every time. I hope it is for you too!
Want To Save this Recipe?
Here's the recipe for Eddie's no knead olive bread. If you make this I hope you'll come back to leave a star rating and a comment. Eddie and I would love to know what you think!
PrintRecipe
No Knead Olive Bread Recipe
- Total Time: 9 hours 20 mins
- Yield: 10-12 1x
Description
Fantastic olive bread made with the no knead method.
Ingredients
Equipment:
- A Banneton (shallow bowl for rising and shaping bread), evenly coated with flour, or a colander lined with cotton dish towel (not terry) that is evenly coated with flour.
- A large Dutch oven with lid or a heavy cast iron or enamel pot with an oven-proof lid
For The Dough:
- 3 cups all-purpose flour plus extra for flouring surfaces
- 2 teaspoons kosher or coarse salt
- 1 tablespoon finely chopped fresh rosemary
- 1 teaspoon active dry yeast
- 1 ½ cups warm water
- 1 tablespoon extra virgin olive oil, plus extra for oiling the bowl
- 1 cup pitted Kalamata olives, sliced into thirds
- 2 tablespoons corn meal, for dusting the bottom of the pot
For Dipping (optional)
- Extra virgin olive oil
- Good quality balsamic vinegar
Want To Save this Recipe?
Instructions
Timing: Start this recipe 9 hours before you plan to eat the bread. While the hands on time is minimal, the bread needs many hours to sit and rise, to create perfectly textured bread.
- For the mix and first rise, put flour, salt, rosemary and yeast in a large bowl and mix thoroughly. Add olive oil to warm water and pour over dry ingredients. Add sliced olives. Using a wooden spoon, stir until all dry flour is incorporated, 2-3 minutes. Cover mixing bowl with plastic wrap and let it stand for 4-5 hours, until dough is approximately doubled in size.
- For the rework and second rise, dough will be wet and bubbly. Using a rubber spatula, scrape the dough onto a generously-floured work surface. Let dough sit for about 5 minutes. Dust the surface of the dough with a sprinkling of flour (about a tablespoon). Fold the dough over and press it with the heel of your hand and flip it over and fold it again. Do this several times, allowing dough to absorbs some of the fresh flour, for 2-3 minutes until it firms up a bit and the outside loses most of its stickiness. (unlike traditional bread recipes, there is no need to deflate the dough or remove bubbles in this step) Rinse and dry the bowl. Lightly coat the bowl with olive oil. Return dough to bowl and roll it around to coat it with oil from the sides of the bowl. Cover with plastic wrap. Let sit for 1 ½ -2 hours, until it is about 50% larger.
- For the rework and final rise, again put dough on a floured surface. Flip and knead about 8-10 times, and form a ball. Put ball into a floured Banneton or colander with floured dish towel. (The final rise container imprints its design onto the bread. If you use a banneton, the bread will have beautiful ridges) Fit the banneton or colander back into the large bowl and cover with plastic wrap. (If it doesn't fit into the glass bowl just cover it with a slightly damp dish towel) Let sit for about 1 - 1 ½ hours.
- About a half hour before dough is ready, place the empty Dutch oven, with its lid on, into the middle of the oven and preheat the oven to 500ºF. When the bread is ready (done rising), carefully take the heated Dutch oven out of the oven, set it on the stove or a heat-proof surface, and uncover it. Sprinkle cornmeal over the bottom of the pot. Flip the dough into center of the Dutch Oven, being careful to avoid contact with the sides of the pot, to get the ideal shape. (If the dough touches the side of the pot, you will need to use a spatula to position it into the center of the pot. It will taste just as good.) Cover pot, place into the hot oven and reduce temperature to 450ºF. Bake for 25 minutes. Remove the lid. Bake for an additional 20-30 minutes until the crust is nicely browned. Remove the pot from the oven, transfer the bread to a cooling rack and let it stand for 20 minutes before slicing.
Notes
[This post first appeared on Panning The Globe in December 2012. It was updated in April 2020 with a couple of new photos, added nutritional information, and clarifying details in the written post.]
- Prep Time: 10 min
- Cook Time: 50 mins
- Category: Bread
- Method: no-knead bread Baking
- Cuisine: Out Of This World
David
This is great bread! Crusty on the outside, chewy and substantive on the inside and delicious to boot!
Annie
Love this recipe!! Thanks!
Sandy
Step 3 actually says: REWORK AND FINAL RISE: Again put dough on a floured surface. Flip and knead about 8-10 times, and form a ball.
See the word "KNEAD" in there??????????
Eddie
Hi Sandy,
Well, what can I say? Caught in the act of sneaking 8-10 kneads into a no knead recipe! Fair enough, but this is virtually no kneading (maybe 30 seconds vs 10 minutes in a typical bread). I hope you can find it in your heart to forgive me. Also, please give this recipe a try and see what you think.
Sandy
quote: Let dough sit for about 5 minutes. Dust the surface of the dough with a sprinkling of flour, fold the dough over and press it with the heel of your hand and flip it over and fold it again. Do this several times, until the dough absorbs the fresh flour and loses most of its stickiness.
THIS IS CALLED KNEADING!!!!! So you can't say this is a 'No Knead' bread!!!!
Annie
Hope the ten kneads don’t stress/tire you out TOO badly!
Bethany
Sandy- I bet you always are right! Don’t be such a Karen.
Kneading to form the bread for a few seconds is far different than traditional kneading to provide strength and structure to the dough.
Kevin
This was absolutely wonderful!!! We have since made it a number of times and everyone who has tasted it thought it was simply amazing.
Eddie
Hi Kevin,
So glad you enjoyed this recipe. Has been a favorite in our family too!
Gerry Kulz
I have been making Jim Lahey's no knead bread for a while and today I am trying your olive bread recipe.
Just wondering if I could put this dough on parchement paper inside the dutch oven as I do with the plain bread. I will let you know how it turns out....can't wait!
Big Al
I always use parchment paper. I do put a trivet on the bottom of the Dutch oven because I use a Lodge brand DO, not an enameled one- keeps it from burning the bottom of the loaf. I love to make garlic and rosemary (roast the garlic cloves first), but the olive I'm looking forward to.
TERESA poe
Could i adapt the recipe to make roasted garlic bread? How much roasted garlic should i use?
I will definitely make the Olive bread first. Thank you!
Lisa
Hi Theresa. Eddie and I haven't tried this with roasted garlic but I love the idea! The recipe calls for a cup of pitted olives, sliced into thirds. I bet if you use the same amount of roasted garlic - about a cup - and slice it into thirds, you'll get great results! I'm sure 3/4 of a cup would work well, too. Keep us posted!
Alex G
Sooo good!
Eileen F
I have been eyeing this recipe for months and finally made it yesterday. I was in and out all day and the timing seemed to work out, except that I had to leave before it came out of the oven. My husband took it out and he is not baker. It turned out perfect! I love olive bread, but it can be pricey to buy. I like that this one is not too heavy.
Next time I will use a bit of the liquid from the olive jar to give it some color, or maybe throw in just a bit of wine for part of the liquid.
I used this for making my peanut butter sandwich and it was great for that. Tomorrow, I'm making a Brie grilled cheese sandwich with it. I can't wait!
Thanks for sharing this recipe!
Diana
I love olive bread and yours looks amazing!
Seeks
That being said, I am drooling over this bread. 🙂
Alina
This sounds like something i can tackle. I had no idea you could do this without a machine!
Deb Perugi
Eddie's olive bread looks so delicious. And you don't have to have a professional oven to make it. I heard about this method before but now, with your recipe, I will try it.